
For years, food companies have struggled with biofilm prevention. Its importance cannot be underestimated and should be addressed through effective sanitation programs. With proper implementation of the sanitation process, biofilms can be removed and prevented, and potential health risks reduced.
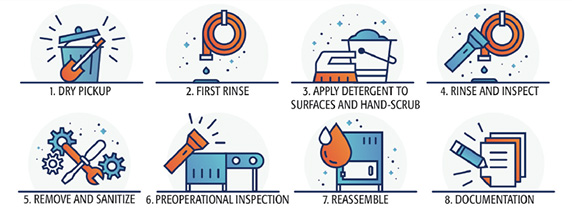 Biofilms are a community of bacterial cells that adhere to each other and surfaces, protected by polysaccharides that act like glue.1 These polysaccharides allow bacteria to attach themselves to surfaces and feed off the protein and soils that have not been removed. Bacteria such as Listeria monocytogenes, Salmonella, and Escherichia coli are some of the more well-known culprits that cause foodborne illnesses. Spoilage bacteria will also attach themselves to surfaces and are the main contributors to shortened shelf life of food products. Although biofilms are difficult to remove, they can be removed with the eight steps of sanitation (Figure 1), which incorporate the four factors of wash: concentration, temperature, time, and mechanical force. As in every aspect of problem-solving, there is no silver bullet that will address the problem exclusively. However, if these eight steps are used in conjunction with robust monitoring, biofilms can be removed and prevented.
Eight Steps of Sanitation
1. Dry Pickup
In this step, it is important to remove protein from product contact surfaces and the floor, as well as pick up any trash or obstructions in the areas that need to be cleaned. It is critical that necessary equipment is disassembled before cleaning is performed and the pieces are stored properly to prevent cross-contamination. The disassembly of equipment allows the inspection of hard-to-reach areas and enables identification of any interior niches that could cause microbial infestation or “harborage.”
2. First Rinse
This step is completed to knock down protein and soils on all equipment and lower walls, starting from the top and working down to the floor, and utilizing a recommended water temperature between 120 °F and 140 °F and at least 130 psi, which is recommended for meat processing plants. Water temperature should not exceed 140 °F because it may bake the soil to the surface, which can increase the potential for microbial growth. Soil removal should be at least 95 percent before moving to Step 3.
3. Apply Detergent to Surfaces and Hand-Scrub
The major function of cleaning chemicals is to lower the surface tension of water so that soils may be loosened and flushed away. This step is essential for the removal of biofilms on equipment. Cleaning chemicals help disintegrate any remaining soil, and hand-scrubbing will continue that breakdown by releasing debris from surfaces for an easier rinse-down. Some key tips for step three:
• Ensure proper foam application from bottom to top on all equipment
• Foam should be left on the equipment for 10–15 minutes, but not be allowed to dry
• Hand-scrubbing should be completed while the foam is on the equipment or with a separate scrub bucket of general-purpose cleaner and a scrub pad
• Scrubbing drains should be performed during this step
• End-of-hose titrations should be conducted and properly documented daily.
During the chemical application and hand-scrubbing, it is important to consider the four factors of wash:
1. Concentration: The concentration of cleaning chemicals should be within the manufacturer’s specified use range to effectively help penetrate, break down, and remove soil/debris.
2. Temperature: Water temperature affects the effectiveness of soil removal and chemistry activation.
3. Time: How long it takes for cleaning chemicals to adequately penetrate, break down, and remove soil from a surface.
4. Mechanical force: Refers to the optimal water pressure or utilization of a scrub pad during the sanitation process to assist with the breakdown and removal of soil on surfaces. Other options also exist, such as clean-in-place and clean-out-of-place. Optimal water pressure may not be available; therefore, it is imperative that the concentration, temperature, and time meet the proper ranges to be effective.
4. Rinse and Inspect
During this step, it is recommended to rinse the foam from all surfaces, starting at the top and working down to the floor. Using high-volume/low-pressure hot water, all chemicals and soil should be removed. A best practice during the rinse step is to inspect equipment, using flashlights to verify the removal of soil.
5. Remove and Sanitize
This steps encompasses production, maintenance, and sanitation working together to reassemble equipment following proper hygienic procedures and Good Manufacturing Practices (GMPs), and to remove condensation and standing water. A best practice directly after this step is to conduct a flood rinse of equipment prior to preoperational inspection.
6. Preoperational Inspection
When conducting the preoperational inspection, the use of a flashlight, organoleptic senses, and hands is helpful in verifying the cleanliness of equipment. This is an extremely important step to help identify any missed opportunities during the cleaning process and address them immediately. Preoperational inspection is not merely walking up and down a line with a flashlight at eye level. An excellent robust preoperational inspection consists of bending down to inspect the lower framework, inside of belts, and hard-to-see locations. It also means climbing ladders to get to the overhead belts or structures that cannot be seen thoroughly from the floor. During the inspection process, the senses of smell, touch, and sight must be utilized, along with any tools possible to increase the opportunity of identifying any deficiencies prior to turning the floor over to the plant.
7. Reassemble
The finishing step to help prevent and control biofilms is the application of a no-rinse level sanitizer. It is important that the sanitizer is titrated before application to ensure regulatory compliance by following the manufacturer’s labeling requirements. The no-rinse level sanitizer should be applied prior to the start of production from the bottom to the top, with 100 percent coverage of all product contact and noncontact surfaces. The underside of equipment, high inside framework, and niche areas should be included.
8. Documentation
The purpose of documentation is to assist in the record-keeping of key elements within the sanitation process. Maintaining accurate records will ensure compliance with customer requirements and regulatory compliance by verifying the cleanliness of the plant.
Characteristics of Soils
Other factors to consider when implementing the eight steps of sanitation can have a tremendous impact on the cleanliness of the plant. It is helpful to take a look at the characteristics of soil and soil attachment. The soil or protein must first be identified. The optimum water temperature range will depend on the type of soil and protein found on plant surfaces. The range commonly used in meat plants is 120 °F to 140 °F with a target of 130 °F to remove soils and proteins. The types of soils and proteins will also determine which detergent or cleaner is used. After the characteristics of the soil have been identified, the water hardness will then need to be considered before selecting the detergent or cleaner that will best fit the process. Water hardness is determined primarily by calcium and magnesium salts in the water. As the surface dries, hard water causes water spots on the equipment, and when reacting with soap these minerals can form soap scum. Water hardness deactivates detergents and can negatively affect sanitizers and disinfectants. This is where certain chemical products are formulated to tie up the calcium and magnesium ions so that the cleaner or sanitizer can tolerate water hardness.1 Once the soil or protein is identified and water hardness is factored in, then the eight steps of sanitation can be implemented. Nevertheless, some hurdles will still need to be addressed for optimum prevention.
Soil Attachment and Sanitary Design
Sanitary design plays a crucial part in the prevention of biofilm. Food equipment must be constructed to ensure effective and efficient cleaning over the life of the equipment. The equipment should be designed to prevent bacterial entry, survival, growth, and reproduction on both product and non-product contact surfaces of the equipment. Soil removal becomes more difficult when there are cracks, crevices, uneven surfaces, or hard-to-clean areas, such as rough welds, broken welds, pitted metal, hollow framework, or rollers. These cracks and crevices become niches or harborage points that make the cleaning process more demanding. Additional tools for cleaning and specific chemical compounds can be used, but will not completely remove what could be embedded within these hard-to-clean areas. Plant management, food safety, and sanitation must partner to identify these areas for immediate repair or replacement to ensure that they do not create harborage for bacteria. An example of a simple repair would be to cap off the rolled metal that is being used as legs for tables or as a framework for belts. Of course, a best practice would be to systematically remove rolled metal and replace it with angle iron for easy access for cleaning. Another example is to smooth out rough welds to eliminate small holes or pitted areas. If the cleaner is to be effective at separating the soil from the surface, then the soil and surface must be thoroughly wet, which is sometimes difficult if the surface is hard to reach or still contains niches or harborage points.
Construction Events
Another factor that should be taken into consideration is construction events. Any time a construction event is planned in a plant, a strategy must be developed to ensure that any potential risks are identified before construction. This plan should also have preventions in place for each identified risk. A coordinated effort among operations, maintenance, food safety and quality assurance, and sanitation is necessary to develop and implement a plan that prevents uncovered biofilms from becoming a problem after construction is over. Construction events have the tendency to uncover or "loosen up" hidden biofilms that have been embedded in floors, walls, and equipment due to poor sanitary design or extensive wear and tear over the years. The construction plan should also incorporate a chemical “script” specifically addressing the area of concern. This chemical script not only includes the eight steps of sanitation and the four factors of wash, but also encompasses intensified cleaning. Intensified cleaning includes, but is not limited to:
• Breaking down equipment to the “bare bones,” which is the removal of all sandwiched parts.
• Use of specific chemicals to address specified equipment, areas, and microbial problems. Success is measured by the results of how closely the strategic plan was followed.
Conclusion
In preventing biofilms from taking over any production area, there is no one-size-fits-all scenario. It takes a reliable sanitation program; a dedicated sanitation team; a partnership with production, maintenance, and sanitation; and diligence to stay on top of identified harborage locations. Starting with the eight steps of sanitation, including the four factors of wash, biofilms can be reduced to a matter of preventive maintenance. It is important to keep in mind other factors that will impact the removal of biofilms, such as sanitary design and construction events. Furthermore, utilizing sanitation resources, such as contract cleaning companies, can be a valuable addition to biofilm reduction and prevention efforts.
Many thanks to Candy Lucas, a Senior Food Safety Director for PSSI, for supplying the expert content and illustration for this article.
Reference
1. Marriott, N.G., et al., Principles of Food Sanitation, 6th ed. (New York: Springer Scientific, 2018).


