
Many articles have been written on environmental swabbing—how to swab, where to swab, and why to swab with a “seek and destroy” approach. This article focuses on how to get meaningful results and how to make the results meaningful using data tracking and trending strategies and tools. Increased long-term benefit from a swabbing program is more likely with effective tracking and trending. You may know which pile of office papers to search for the Certificates of Analysis with positive results, but that’s not a good form of tracking. And it makes trending impossible. If the resulting data are kept in a spreadsheet, you can readily tell that a site went from positive to negative after cleaning. Problem solved, case closed—right? Maybe. It isn’t always as simple as that. Efficient tracking and trending of the data will often help determine actions to take after a positive result and whether the course taken was truly effective. If repeat positives occur in an area, it could be an indication that there’s a bigger, perhaps systemic issue that the corrective actions are not addressing.
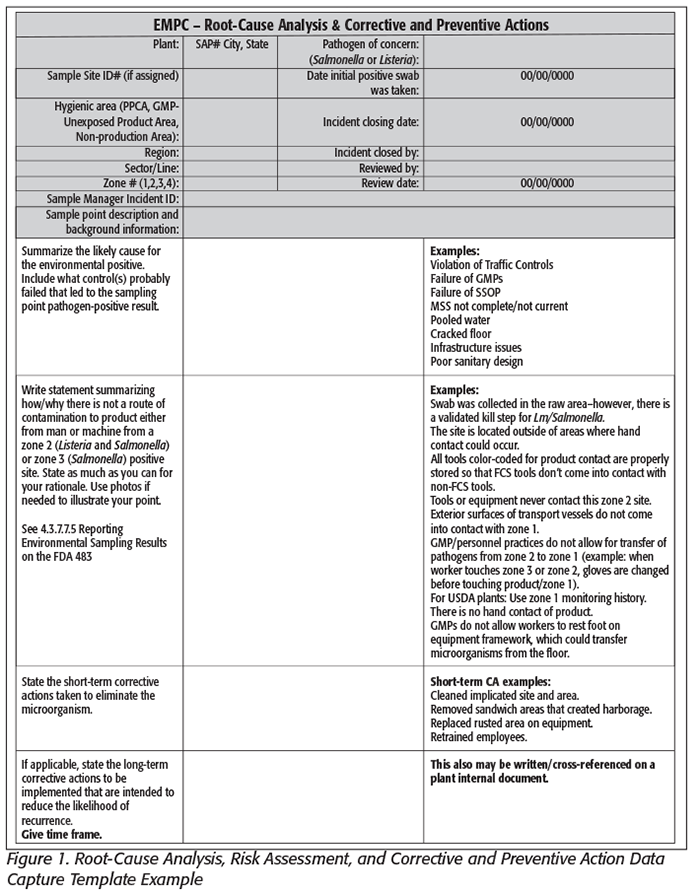 Trending environmental monitoring data (captured using a template like the one shown in Figure 1) can help with a root-cause analysis to uncover the origins of the positive finding and may inform the mitigation strategy. Trending may even help predict areas of future positives, allowing for enhancement of hygienic zoning programs before finished-product areas—or worse, finished product—are impacted. Organizing data by areas within the facility and applying visualizations to trend reports can add richness to an environmental monitoring program beyond the elimination of positive sites.
Master Data Are Key
Site selection and description are the bases of getting meaningful results and effective trending. All components of a site description such as facility area, hygienic area, and zone will help facilitate dynamic trending and should be part of the master data. Therefore, when describing the swabbing sites on the site list, include as much master data about the site as possible. Determine in which area of the plant the site is located and whether it is a product contact surface (zone 1), adjacent to it (zone 2), in the area but not adjacent to the product contact surface (zone 3), or further removed from production areas (zone 4). Before including these components, begin with mapping the facility and identifying the hygienic zones within it. The scope would include areas where materials and products are received, stored, processed, and packaged. The concept of hygienic zoning and its role as a preventive control has been well discussed in the literature.[1–4] Specifically speaking, the principles of hygienic zoning focus on prevention of cross-contamination of exposed ready-to-eat (RTE) products with environmental pathogens. Hence, it is important to understand the significance of different hygienic areas and their role in preventing the spread of pathogens to areas that handle exposed RTE products.
 For example, consider the following areas for hygienic zoning: nonproduction area, basic Good Manufacturing Practices (GMPs)-raw area, transitional area, GMP unexposed-product area, and primary pathogen control area (exposed finished-product area). Color-code the hygienic zones on the floor plan map to visualize risk (Figure 2). Looking at the facility from this perspective will help assess the risks associated with the environment, allowing for the design of a robust hygienic zoning program. Moreover, adding foot and equipment traffic patterns to the map can help identify potential routes of pathogen spread between areas and determine where to place shoe- and wheel-sanitizing stations, for example. Next, divide the plant into distinct areas within the hygienic zones based on physical infrastructure or manufacturing activity. Sometimes, for related but distinct areas, it’s a good idea to add another level of distinction by further dividing them into subareas. Each swab site will fall into an area and subarea—like a GPS for sampling points. Include these master data with all sampling points. This type of hierarchy built into the sampling sites allows faster filtering and grouping when analyzing the data and may bring to light relationships between areas.
Lock In the Sampling Plan
Once hygienic zones and specific areas to monitor have been identified, plan the required monitoring activities to be associated with each. When determining which sites to swab each week, it is recommended to randomize the selection of the sampling points from the site list. However, this selection should not be completely random. If you are a betting person, you know that on a given week, all samples could be in nonproduction areas! Therefore, organize the swab sites into smaller groupings and randomize within those groupings. An example of this could be to organize by proximity to product contact zones (zones 1, 2, 3, or 4) within a subarea so that the randomizer selects a sufficient number for those areas. This will ensure an adequate snapshot of conditions in all areas of the plant obtained at each routine swabbing event—typically each week. In guidance issued to industry, the U.S. Food and Drug Administration (FDA) has recommended weekly swabbing for Listeria,[5] and the Grocery Manufacturers Association (GMA) has recommended for Salmonella that “each facility should determine the frequency adequate for its product and process,” and “A rotation schedule should be developed to allow all areas of the plant to be sampled on a periodic basis, e.g., weekly monitoring with rotation of sites between different areas of the plant, with all sites sampled within a specified time period (e.g., monthly or quarterly).”1
Environmental monitoring swabs collected as a verification of pathogen control programs/hygienic zoning are to be collected at random hours any time after 3 hours into production. Document the date and time swabs were collected so they can be available for trending. Software and services are available that can assist in storing, organizing, and managing sample master data, sampling numbers, and frequencies to meet program requirements. More on this below.
Secure the Environment and Strengthen Records with Effective Mitigation and Documentation
In the event of a presumptive result, corrective action should be taken upon notification. Waiting on confirmation results could take a week or longer and may put additional product at risk. To ensure crucial details of environmental conditions are not obscured by time, commence with the root-cause analysis immediately and document all findings. Have a clear and detailed procedure regarding what will be done, by whom, when, where, and how. Take pictures of the area where the positive result was found and mark the location of the positive site and the vector swab sites taken during corrective actions. This photo may give a larger perspective regarding the area, including contributing factors, and can help communicate the scenario to the cross-functional team members who may have additional insight. Remember, vectoring should be done in a three-dimensional “starburst” from the implicated site, not just on a two-dimensional plane. Splashes, drips, and aerosols from above or below should be considered. Keep these pictures in the root-cause investigation file. A template written in a question format will help the team brainstorm and can be used to capture all aspects of the root-cause analysis, risk assessment, and corrective/preventive actions (Figure 1). Fight the temptation to give overly simple answers and miss the opportunity to really get to the bottom of a problem and “reduce likelihood of recurrence.” Finally, be sure to document the risk assessment on whether there was or was not a route of contamination to product and disposition of product appropriately. Examples given in column 3 of Figure 1 are merely to start the conversation and should be expounded upon. These records are needed to demonstrate compliance with requirements in 21 C.F.R. Section 117.150 Corrective actions and corrections:
(2) The corrective action procedures must describe the steps to be taken to ensure that:
(i) Appropriate action is taken to identify and correct a problem that has occurred with implementation of a preventive control;
(ii) Appropriate action is taken, when necessary, to reduce the likelihood that the problem will recur;
(iii) All affected food is evaluated for safety; and
(iv) All affected food is prevented from entering into commerce, if you cannot ensure that the affected food is not adulterated under Section 402 of the Federal Food, Drug, and Cosmetic Act or misbranded under Section 403(w) of the Federal Food, Drug, and Cosmetic Act.
Getting Real (A Practical Example)
Envision dealing with Listeria positives in a secondary packaging room. The corrective actions are to clean the positive area, review the Sanitation Standard Operating Procedures (SSOPs) and change the cleaning procedure, re-swab, and clear the positive after three consecutive negative results on the site (for corrective action verification). Unfortunately, this scenario repeats itself every few weeks but with a different site coming up positive each time. Sound familiar? You might not think too much about that room when just tracking the data because you were confident that positive sites were turning into negative sites. However, if you were looking at the data holistically by trending, you may notice that this packaging room should be something to worry about. In this real situation, it is apparent that there was a deeper issue being missed. Traffic patterns and positive sites plotted on the hygienic zoning map helped implicate poorly capped drains that weren’t on the master sanitation schedule. Subsequently, the lower equipment legs were becoming contaminated, and harborage sandwich areas were discovered. Until these findings could be mitigated (drains addressed, sandwich areas removed), hygienic zoning programs were improved by requiring shoe and wheel sanitizing prior to exiting this area. The SSOPs were improved, and heightened environmental monitoring was implemented. This served as a containment strategy to keep other areas of the plant from becoming contaminated.
The Regulatory Perspective on Trending
Trending data can be a powerful tool for “seek and destroy” and can have many “positive” benefits such as driving change toward plant program improvement—something not lost on regulatory agencies. The U.S. Department of Agriculture Food Safety and Inspection Service’s Compliance Guideline: Controlling Listeria monocytogenes in Post-Lethality Exposed Ready-to-Eat Meat and Poultry Products – January 2014 says that establishments should track their sampling results over time to identify Listeria trends that can consist of increases in positive samples over a particular period (e.g., weekly, biweekly, monthly, quarterly, or semi-annually) or increases in positives in particular sites or areas.[6] Also, by tracking percentage of positive sampling results, an establishment can determine whether the percentage is increasing, indicating that changes in cleaning protocols or sanitation procedures should be made. When Listeria trends are identified, corrective actions (including intensified sampling and intensified sanitation performed in conjunction with a comprehensive investigation) should be taken to address the trend.
In FDA’s Draft Guidance: Control of Listeria monocytogenes in Ready-To-Eat Foods: Guidance for Industry, it specifically instructs to analyze environmental monitoring data over time for trends.[5] In GMA’s Control of Salmonella in Low-Moisture Foods guidance, the recommendation is that “sites may be sampled on a continuing basis to assess trends. Sampling data should be reviewed on a routine basis. The sampling program should be dynamic and responsive to the data generated.”[1]
Several sections within 21 C.F.R. 117 allude to the need for tracking and trending data such that appropriate corrective actions can be taken.7,8 The keyword when reading these is verification. FDA inspection Warning Letter examples show that finding environmental pathogens is not the problem. Failure to take effective and appropriate action whereby a facility can “correct the problem(s) and reduce the likelihood that the problem(s) (will) recur” was typically cited.[9–12]
Effectively Using Tools for Tracking and Trending
We’ve discussed what to do to set up a monitoring program for success and why to do it; now we’ll get into more of the how. Site descriptions, sampling plans, and follow-up activities (as previously described) can be best managed using a master database with front-end software and custom-designed, automated work flows for routine and nonroutine (corrective action and follow-up) processes. In addition to generating routine random sampling points and times, such software can help connect all activities related to incident management in a traceable manner that will facilitate better trending and regulatory compliance. Several software and service options are on the market and should be vetted based on need and the complexity of the target programs. Working together, they standardize the data format, help ensure compliance to routine and corrective action sampling regimens as described in environmental monitoring procedure(s), and keep results saved and linked in an organized manner.
Give the data a clear, powerful voice through visualization. A picture is worth a thousand words, right? With data organized and saved in a thoughtfully built database, visualization of data geographically and historically becomes possible through any number of software programs. Designing the plan within a framework of hygienic zoning, clearly defined areas, and sufficient sampling frequency enables geographical trending by specific area to see if/where higher percentages of positives are clustered. Plotting data on dynamic hygienic zoning maps that highlight “percent acceptable samples” or “hits” for a given time frame can show whether several areas or sites turning up positive at the same time may be connected (Figure 2). This can help facilitate better root-cause analysis, and the risk associated with the implicated area can be more easily deduced. Additionally, having traffic patterns defined on these maps may also help determine whether foot or equipment movement is a contributing factor.
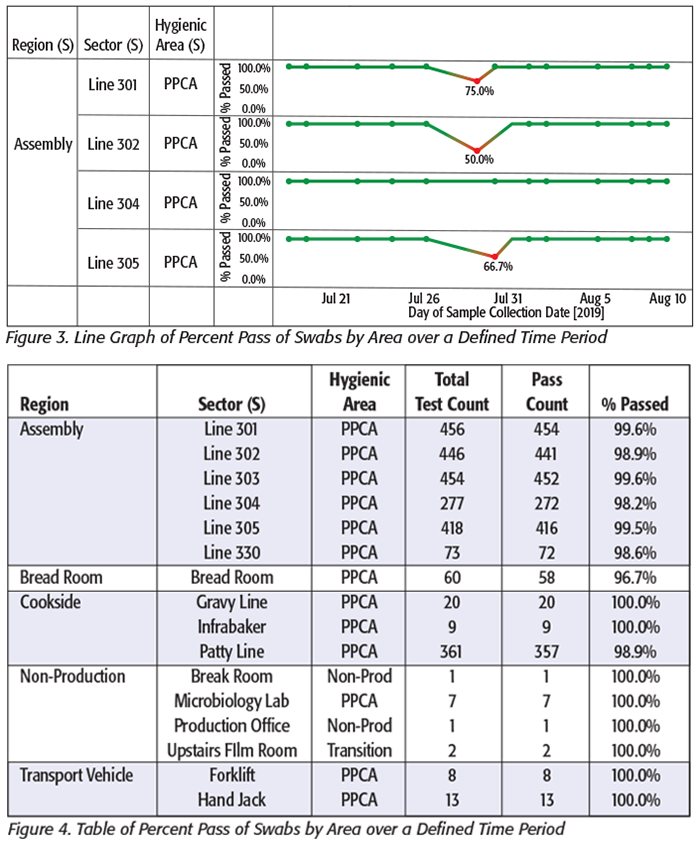 Data can be plotted on a dynamic line (Figure 3) or table (Figure 4) with color changes highlighting “hits” over weeks, months, quarters, or years. This type of view can show if time-related patterns emerge in certain areas or for a certain site. This information used in conjunction with production schedules or other plant events can aid in root-cause analysis investigations and corrective/preventive actions to solve and correct issues. It may even help predict and prevent future problems. Side-by-side or overlying comparisons between hygienic zones, areas, and sites may reveal links between sites otherwise thought to be unrelated. For example, Figure 3 shows a scenario where several lines within a region all showed a dip in percent pass environmental monitoring results during the same period, pointing to what could be an issue in the larger area rather than an isolated line. Compliance checks to ensure adherence to environmental monitoring program requirements—collecting the correct number of swabs from each area at the correct frequency—can also be done (Figure 5). Regardless of the details chosen for visualization and reporting, information from each contributing sample needs to be in the appropriate hierarchical framework so that exact site information and individual test results can be easily retrieved.
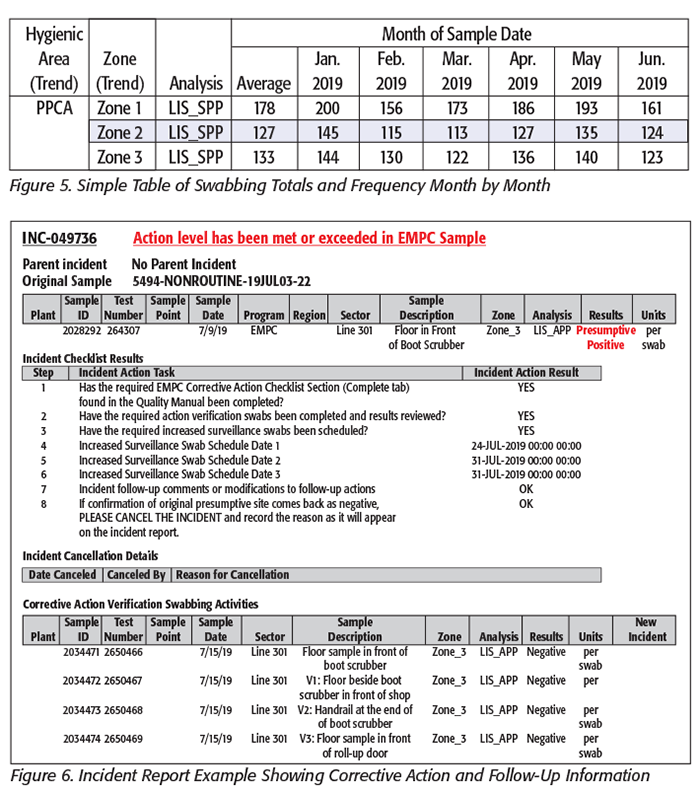 Finally, organize positive sample follow-up activities into standardized, concise reports (incident reports). This can be done through software that pulls in linked data from the database and organizes them in a comprehensive, orderly manner. For example, use a format that lists the original site information with all related data for the positive test at the top, followed by a series of required questions and answers based on and referenced to the company/facility environmental monitoring program (software driven—prevents incident close-out unless complete) and completed by a section displaying all follow-up corrective action, vector, and increased surveillance swab site information and test results (Figure 6). These can be invaluable if, 6 months later, there is a need to produce records detailing how a presumptive swab was mitigated for an audit or inspection. While all this seems like a daunting task that requires a huge amount of work, some initial effort to build a system and automate your data reporting and tracking will make this much more manageable. Furthermore, this up-front work and cost will pay back many times over, not only in consumer safety but also in reduced downtime at the plant and decreased use of resources as the number of presumptive positive findings progressively declines.
Conclusions
In this article, we discussed some basic organization and reporting strategies so that meaningful, comprehensive results can be obtained from an environmental monitoring program. Thoughtfully identifying and organizing sample sites followed by applying visual analysis tools provides trending and tracking capabilities. These data can enable a better understanding of the sanitary state of the facility’s environment over time, enhance root-cause analysis investigation by providing additional detail, increase the effectiveness of corrective actions through a better understanding of contributing factors, and provide the information needed to construct a comprehensive record of mitigation. Together, these factors help prove that the likelihood of problems recurring has been reduced. All of this results in a better-running facility with a better regulatory reputation and, eventually, significantly reduced costs—not to mention improved food safety. Say goodbye to the piles of Certificates of Analysis on your desk and truly get your hands around your environmental monitoring program!
Christopher M. Showalter is a senior microbiologist, Food Safety and Microbiology, at Conagra Brands.
Nancy Dobmeier, CQA, CHA, is a principal microbiologist, Food Safety and Microbiology, at Conagra Brands.
Eva Zaring is a team leader, Quality, Plant Operations, at Conagra Brands.
References
1. www.gmaonline.org/downloads/technical-guidance-and-tools/SalmonellaControlGuidance.pdf.
2. www.almonds.com/sites/default/files/pem_book.pdf.
3. affifoodsafety.org/best-food-safety-practices/hygienic-zoning/.
4. Food Safety Preventive Controls Alliance. Preventive Controls for Human Food: Appendix 6, Hygienic Zoning and Environmental Monitoring, 1st ed. (Bedford Park, Illinois: Food Safety Preventive Controls Alliance, 2015).
5. FDA. 2017. Control of Listeria monocytogenes in Ready-To-Eat Foods: Guidance for Industry.
6. USDA-FSIS. 2014. Compliance Guideline: Controlling Listeria monocytogenes in Post-
Lethality Exposed Ready-to-Eat Meat and Poultry Products – January 2014.
7. 21 C.F.R. 117.145 (a–c).
8. 21 C.F.R. 117.165 (b) (3).
9. FDA Warning Letter Example 1: FEI Number 1922195, Inspection Dates 12/12/2017–1/4/2018.
10. FDA Warning Letter Example 2: FEI Number 3007236790, Inspection Dates 6/27/2017–7/13/2017.
11. FDA Warning Letter Example 3: FEI Number 1815229, Inspection Dates 6/12/2017–6/21/2017.
12. FDA Warning Letter Example 4: FEI Number 3003192054, Inspection Dates 4/3/2017–4/27/2017.


